ElasticSearch 安装与运行
目录
公号:码农充电站pro
本节来介绍 ES 的安装。
1,下载 ES
ES 是基于 Java 语言开发的,因此,要安装 ES,首先需要有 Java 环境。
从 ES 7.0 开始,ES 内置了 Java 环境,所以如果安装的是 7.0 及以上版本的 ES,就不需要额外安装 Java 环境了。
我们可以到 ES 的下载页面去下载 ES 安装包,你可以根据你的系统,选择不同的安装包进行安装。
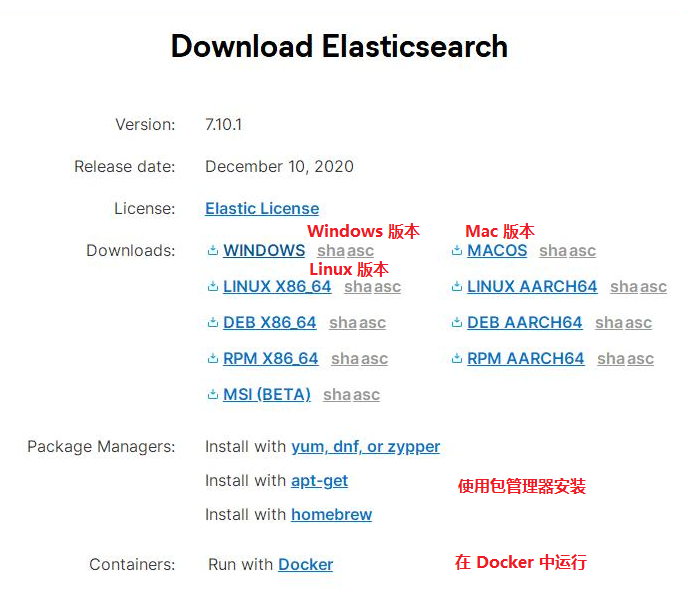
我这里选择的是 Windows 版本,下载好压缩包后,将其解压。解压后的目录如下所示:
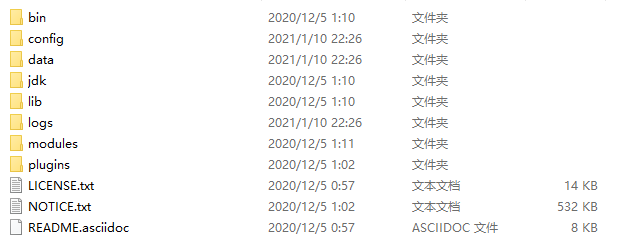
来看下每个目录的作用:
- bin 目录中是一些工具命令。
- data 目录存储数据文件。
- jdk 目录是 Java 运行环境。
- lib 目录是 Java 开发类库。
- logs 目录用于存放日志。
- modules 目录中包含了所有的 ES 模块。
- plugins 目录包含所有已安装的插件。
- config 目录是一些配置文件。
elasticsearch.yml文件用于配置 ES 服务。jvm.options文件用于配置 JVM 参数。- 其中 Xmx 和 Xms 建议设置的大小一样,且不超过机器内存的一半。
- Xmx 和 Xms 默认为 1g。
- 这里有一些介绍,你可以参考一下。
2,启动 ES
bin 目录中有一个 elasticsearch 命令,用于运行 ES 实例。我们可以通过 --help 参数查看其帮助:
> bin\elasticsearch --help
Starts Elasticsearch

Option                Description
------                -----------
-E <KeyValuePair>     Configure a setting
-V, --version         Prints Elasticsearch version information and exits
-d, --daemonize       Starts Elasticsearch in the background `在后台运行`
-h, --help            Show help
-p, --pidfile <Path>  Creates a pid file in the specified path on start
-q, --quiet           Turns off standard output/error streams logging in console
-s, --silent          Show minimal output
-v, --verbose         Show verbose output
进入到解压后的目录中,在 Windows 系统中用下面命令来启动 ES:
bin\elasticsearch
在 Linux 系统中使用下面命令启动 ES:
bin/elasticsearch
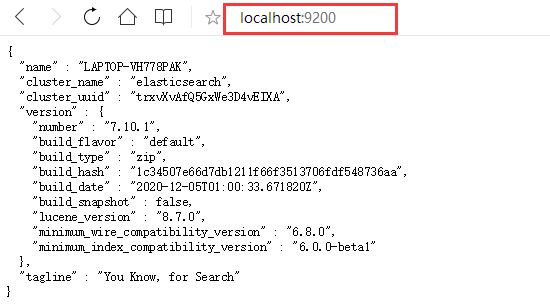
如果启动成功,ES Server 将在本机的 9200 端口监听服务。
我们可以使用 curl 命令访问本机 9200 端口,查看 ES 是否启动成功。如果输出像下面这样,则说明启动成功:
> curl http://localhost:9200/
{
  "name" : "LAPTOP-VH778PAK",
  "cluster_name" : "elasticsearch",
  "cluster_uuid" : "trxvXvAfQ5GxWe3D4vEIXA",
  "version" : {
    "number" : "7.10.1",
    "build_flavor" : "default",
    "build_type" : "zip",
    "build_hash" : "1c34507e66d7db1211f66f3513706fdf548736aa",
    "build_date" : "2020-12-05T01:00:33.671820Z",
    "build_snapshot" : false,
    "lucene_version" : "8.7.0",
    "minimum_wire_compatibility_version" : "6.8.0",
    "minimum_index_compatibility_version" : "6.0.0-beta1"
  },
  "tagline" : "You Know, for Search"
}
你也可以在浏览器中访问服务地址,来查看是否启动成功:
3,安装 ES 插件
我们可以通过安装 ES 插件来为 ES 扩展功能。
bin 目录中有一个 elasticsearch-plugin.bat 命令,是关于 ES 插件的命令,可以使用 --help 参数来查看其用法:
> bin\elasticsearch-plugin --help
A tool for managing installed elasticsearch plugins

Commands
--------
list - Lists installed elasticsearch plugins
install - Install a plugin
remove - removes a plugin from Elasticsearch

Non-option arguments:
command

Option             Description
------             -----------
-E <KeyValuePair>  Configure a setting
-h, --help         Show help
-s, --silent       Show minimal output
-v, --verbose      Show verbose output
使用 list 参数查看是否有插件:
> bin\elasticsearch-plugin list
没有任何输出,说明没有插件。
下面演示安装 analysis-icu 插件,这是一个分词插件:
> bin\elasticsearch-plugin install analysis-icu
-> Installing analysis-icu
-> Downloading analysis-icu from elastic
[=================================================] 100%
-> Installed analysis-icu
安装完成后,再次查看插件列表:
> bin\elasticsearch-plugin list
analysis-icu
可以看到,这时有了一个插件。
重新启动 ES 服务后,我们也可以访问 HTTP 接口来查看插件:
> curl localhost:9200/_cat/plugins
LAPTOP-VH778PAK analysis-icu 7.10.1
`服务名称`       `插件名称`    `插件版本`
添加 ?v 后缀可以查看字段的解释:
> curl localhost:9200/_cat/plugins?v
name            component    version  `解释`
LAPTOP-VH778PAK analysis-icu 7.10.1
这里是关于 ES 插件的介绍,你可以了解一下。
4,运行 ES 集群
我们可以运行多个 ES 实例,将其组成一个 ES 集群,命令如下:
> bin\elasticsearch -E node.name=node1 -E cluster.name=escluster -E path.data=node1_data -d
> bin\elasticsearch -E node.name=node2 -E cluster.name=escluster -E path.data=node2_data -d
> bin\elasticsearch -E node.name=node3 -E cluster.name=escluster -E path.data=node3_data -d
其中 -E 用于指定命令参数,node.name 表示节点名称,cluster.name 表示集群名称,path.data 表示数据目录,-d 表示在后台运行实例。
查看集群中的节点:
> curl localhost:9200/_cat/nodes?v
ip        heap.percent ram.percent cpu  node.role  master name
127.0.0.1           30          91   9  cdhilmrstw -      node2
127.0.0.1           28          91   9  cdhilmrstw -      node3
127.0.0.1           34          91   9  cdhilmrstw *      node1
可以看到有 3 个节点,分别是 node1,node2,node3。其中标有星号 * 的节点为主节点。
默认情况下,集群中启动的第一个节点,会将自己选举为 Master 节点。
查看集群健康状态:
> curl localhost:9200/_cluster/health
{
    "cluster_name":"escluster",   `集群名称`
    "status":"green",             `健康状态`
    "timed_out":false,            `是否超时`
    "number_of_nodes":3,          `节点数量`
    "number_of_data_nodes":3,     `数据节点数量`
    "active_primary_shards":0,
    "active_shards":0,
    "relocating_shards":0,
    "initializing_shards":0,
    "unassigned_shards":0,
    "delayed_unassigned_shards":0,
    "number_of_pending_tasks":0,
    "number_of_in_flight_fetch":0,
    "task_max_waiting_in_queue_millis":0,
    "active_shards_percent_as_number":100
}
(本节完。)
推荐阅读:
欢迎关注作者公众号,获取更多技术干货。

文章作者 @码农加油站
上次更改 2021-02-03