如何用hugo 搭建博客
目录
1,Hugo 简介
搭建个人博客有很多开源的博客框架,我们要介绍的框架叫作Hugo。Hugo 是一个基于Go 语言的框架,可以快速方便的创建自己的博客。
Hugo 支持Markdown 语法,我们可以将自己的文章写成Markdown 的格式,放在我们用Hugo 创建的博客系统中,从而展示给他人。

2,Hugo 安装
在Windows 中安装
首先安装choco 包管理器,需要在管理员权限下运行cmd,执行如下命令,一般情况下,网络没有问题,即可安装成功:
powershell -NoProfile -ExecutionPolicy unrestricted -Command "iex ((new-object net.webclient).DownloadString('https://chocolatey.org/install.ps1'))"

# 设置环境变量
SET PATH=%PATH%;%ALLUSERSPROFILE%\chocolatey\bin
然后使用choco 安装 hugo:
# 墙内安装可能较慢
choco install hugo -confirm
在MacOs 中安装
使用brew 命令安装:
brew install hugo
在Linux 中安装
在Linux 中可以使用snap 命令来安装,执行下面命令:
snap install hugo
如果你的Linux 是Ubuntu 版本,也可是使用apt 来安装,但是apt 安装的hugo 可能不是最新版的,这样会对一些hugo 主题的使用有所限制。
这种情况下我们可以到hugo 的github 仓库 中下载安装包来安装hugo,我们可以下载一个deb 包,然后使用如下命令安装:
dpkg -i <package.deb>
3,Hugo 是否安装成功
不管在哪种系统中安装Hugo,最后我们都可以使用下面命令查看Hugo 是否安装成功:
>>> hugo version
Hugo Static Site Generator v0.68.3-157669A0 linux/amd64 BuildDate: 2020-03-24T12:05:34Z
4,使用Hugo 创建博客
hugo 安装成功后,使用hugo new site 命令创建博客:
# 博客项目的名字为myblog
hugo new site myblog
这个命令会创建一个名为myblog 的目录,这就是博客的根目录。目录结构如下:
├── archetypes
│   └── default.md
├── config.toml			# 博客站点的配置文件
├── content				# 博客文章所在目录
├── data
├── layouts				# 网站布局
├── static				# 一些静态内容
└── themes				# 博客主题
5,下载博客主题
创建好博客项目后,接下来是下载hugo博客的主题,这里有很多主题,我们可以任意挑选,比如我们选择了bootstrap4-blog 主题。
然后在myblog 目录下使用git 命令来下载主题:
git clone https://github.com/alanorth/hugo-theme-bootstrap4-blog.git themes/hugo-theme-bootstrap4-blog
下载下来的主题会放在themes 目录中:
└── hugo-theme-bootstrap4-blog
    ├── CHANGELOG.md
    ├── LICENSE.txt
    ├── README.md
    ├── archetypes
    ├── assets
    ├── exampleSite         # 本主题示例内容
    |      ├── content		# 示例博客文章
    │      |-- static
    │      |-- config.toml	# 本主题配置
    ├── i18n
    ├── images
    ├── layouts
    ├── package-lock.json
    ├── package.json
    ├── screenshot.png
    ├── source
    ├── theme.toml
    └── webpack.config.js
5,使用主题
我们将exampleSite 目录中的内容,复制到博客根目录myblog 中,在myblog 目录中执行命令:
cp themes/hugo-theme-bootstrap4-blog/exampleSite/* ./ -r
6,启动博客服务
使用下面命令启动服务:
>>> hugo server
                   | EN
-------------------+-----
  Pages            | 29
  Paginator pages  |  0
  Non-page files   |  0
  Static files     |  1
  Processed images |  0
  Aliases          | 12
  Sitemaps         |  1
  Cleaned          |  0

Built in 60 ms
Watching for changes in /home/wp/t/myblog/{archetypes,content,data,layouts,static,themes}
Watching for config changes in /home/wp/t/myblog/config.toml
Environment: "development"
Serving pages from memory
Running in Fast Render Mode. For full rebuilds on change: hugo server --disableFastRender
Web Server is available at http://localhost:1313/ (bind address 127.0.0.1)
Press Ctrl+C to stop
可以看到服务默认会在占用1313 端口,在浏览器中访问http://localhost:1313/ 地址。
如果一切正常,我们会看到一个像hugo 官网演示一样的页面。
7,编写博客文章
你只需要按照Markdown 的格式编写自己的文章,然后将写好的文章放在myblog/content/posts,hugo 就会读取到这片文章,并将这片文章展示在比的博客中。
与普通Markdown 文章不一样的地方是,你需要在文章的开头写入如下结构的内容,这些内容包含在三杠线之间,在三杠线下边就是Markdown 的正文了:
---
文章属性内容
---
Markdown 正文
这些内容会被hugo 解析,作为当前文章的一些属性,常用的属性如下:
---
title: "文章标题"			# 文章标题
author: "作者"				# 文章作者
description : "描述信息"	# 文章描述信息
date: 2015-09-28			# 文章编写日期
lastmod: 2015-04-06			# 文章修改日期

tags = [					# 文章所属标签
    "文章标签1",
    "文章标签2"
]
categories = [				# 文章所属标签
    "文章分类1",
    "文章分类2",
]
keywords = [				# 文章关键词
    "Hugo",
    "static",
    "generator",
]

next: /tutorials/github-pages-blog		# 下一篇博客地址
prev: /tutorials/automated-deployments	# 上一篇博客地址
---
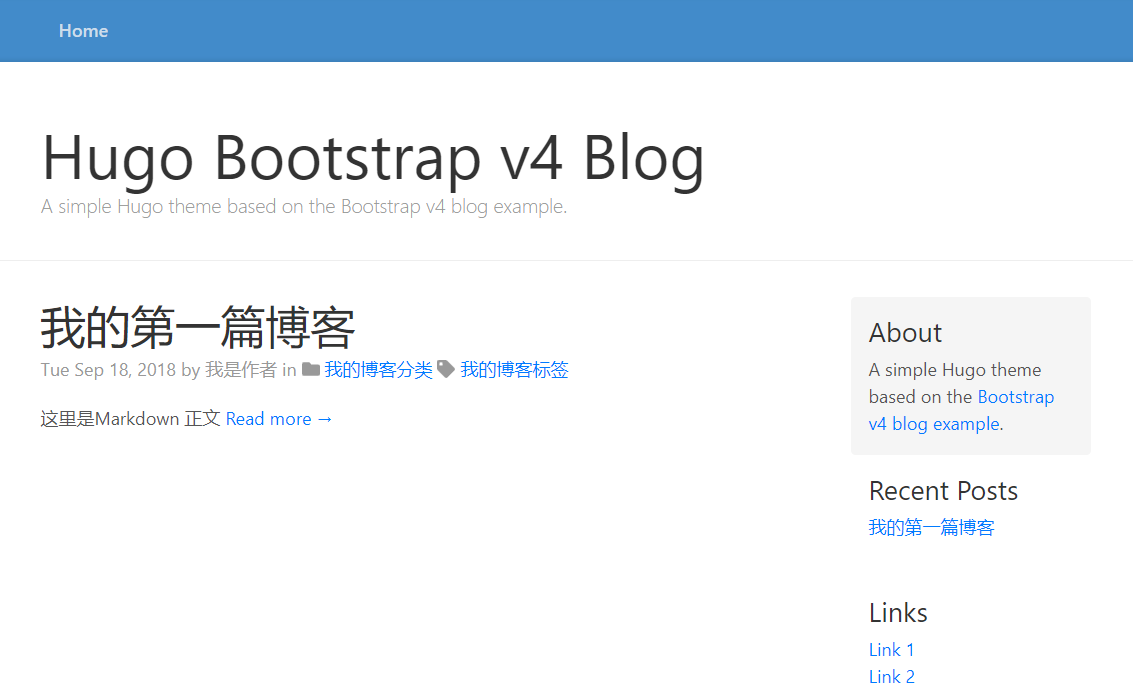
比如我们编写了这样一篇文章,文件名为my-first.md:
---
title: "我的第一篇博客"
author: "我是作者"
description : "这是描述信息"
date: 2018-09-18
lastmod: 2018-09-26

tags : [
"我的博客标签",
]
categories : [
"我的博客分类",
]
keywords : [
"我的博客关键字",
]
---
这里是Markdown 正文
我们将myblog/content/posts 目录中的其它文章删除,只留我们自己的这篇文章:
.
└── my-first.md
使用hugo server 重启博客服务,打开地址http://localhost:1313/,可以看到现在的博客中,只有我们自己写的文章:
8,Hugo 的配置文件
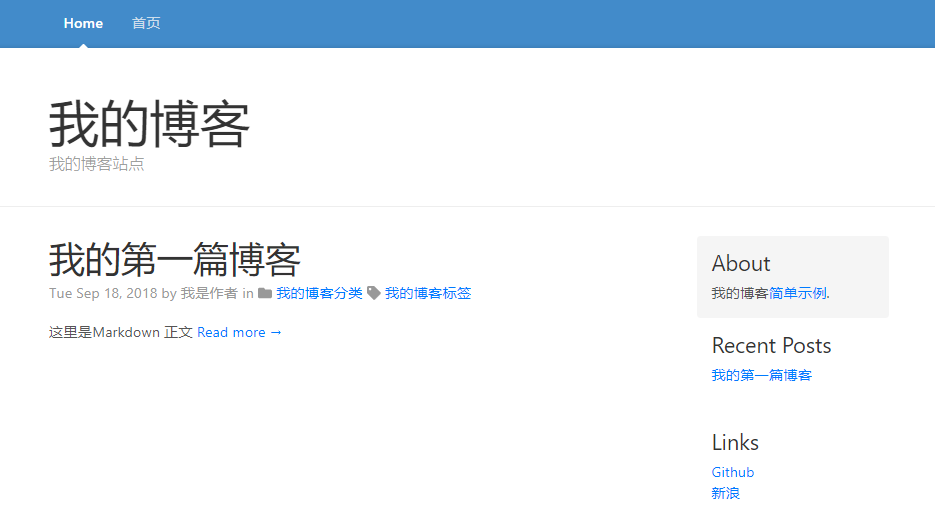
博客的配置文件可以根据自己的需要修改,我们来看下Bootstrap v4 主题的配置文件,这些配置属性通过应为并不难理解。
配置文件中属性的内容我做了修改,并添加了中文注释。
# Hugo 属性设置

# 网站地址
baseurl = "https://localhost:1313/"

# 网站语言
languageCode = "en-us"

# 网站title
title = "我的博客"

# 主题的名字,这个要跟myblog/themes 目录中的子目录的目录名一致
theme = "hugo-theme-bootstrap4-blog"

# home/category/tag 页面显示的文章数 (Default: 10)
paginate = 5

# home/category/tag 页面用于摘要的字数 (Default: 70)
summaryLength = 50

# optionally override the site's footer with custom copyright text
# copyright = "Except where otherwise noted, content on this site is licensed under a [Creative Commons Attribution 4.0 International license](https://creativecommons.org/licenses/by-sa/4.0/)."
#googleAnalytics = "UA-123-45"
#disqusShortname = "XYW"

# 博客链接的路径格式
[permalinks]
  posts = "/:year/:month/:title/"
  page = "/:slug/"

# 顶部栏
[[menu.navbar]]
  name = "首页"
  url = "http://localhost:1313"

# 侧边栏,可以写多个
[[menu.sidebar]]
  name = "新浪"
  url = "https://www.sina.com"

[[menu.sidebar]]
  name = "Github"
  url = "https://github.com"

# Theme 属性设置
#
[params]
  # Site author
  author = "作者名"

  # homepage 页描述信息
  description = "我的博客站点"

  # Show header (default: true)
  #header_visible = true

  # Format dates with Go's time formatting
  date_format = "Mon Jan 02, 2006"

  # verification string for Google Webmaster Tools
  #google_verify_meta = "BAi57DROASu4b2mkVNA_EyUsobfA7Mq8BmSg7Rn-Zp9"

  # verification string for Bing Webmaster Tools
  #bing_verify_meta = "3DA353059F945D1AA256B1CD8A3DA847"

  # verification string for Yandex Webmaster Tools
  #yandex_verify_meta = "66b077430f35f04a"

  # Optionally display a message about the site's use of cookies, which may be
  # required for your site in the European Union. Set the parameter below to a
  # page where the user can get more information about cookies, either on your
  # site or externally, for example:
  #cookie_consent_info_url = "/cookie-information/"
  #cookie_consent_info_url = "http://cookiesandyou.com"

  # show sharing icons on pages/posts (default: true)
  #sharingicons = true

  # Display post summaries instead of content in list templates (default: true)
  #truncate = true

  # Disable the use of sub-resource integrity on CSS/JS assets (default: false)
  # Useful if you're using a CDN or other host where you can't control cache headers
  #disable_sri = false

  [params.sidebar]
    # Optional about block for sidebar (can be Markdown)
    about = "我的博客[简单示例](http://localhost:1313/)."

    # 侧边栏显示最近几条文章 (Default: 5)
    #num_recent_posts = 2

  [params.social]
    # Optional, used for attribution in Twitter cards (ideally not a person
    # for example: nytimes, flickr, NatGeo, etc).
    # See: https://dev.twitter.com/cards/types/summary-large-image
    twitter = "username"

# Default content language for Hugo 0.17's multilingual support (default is "en")
# See: https://github.com/spf13/hugo/blob/master/docs/content/content/multilingual.md
#DefaultContentLanguage = "en"

# Languages to render
#[languages.en]
#[languages.bg]
  # Bulgarian date format is dd.mm.yyyy
  #date_format = "02.01.2006"

# vim: ts=2 sw=2 et
我们使用以上配置文件,再次启动服务,访问http://localhost:1313,得到如下页面:
9,将博客部署在Git
建好自己的博客后,需要将其部署在公网,才能让别人访问。有两种方法:
- 购买自己的域名和服务器,将博客部署在上面。
- 将博客托管在github。
这里我们介绍第2中方式。
9.1,准备要部署的内容
要想讲博客部署在github,首先得有一个github 账号。
然后需要在github 上创建一个仓库,用于存放我们的博客系统。
我们创建的仓库的名字应该是这种格式"账户名.github.io”,比如我创建的仓库的名字为"codeshellme.github.io”。
要向仓库中存放的内容,使用hugo 命令生成的。在myblog 目录下,运行hugo 命令:
>>> hugo
                   | EN
-------------------+-----
  Pages            | 14
  Paginator pages  |  0
  Non-page files   |  0
  Static files     |  1
  Processed images |  0
  Aliases          |  6
  Sitemaps         |  1
  Cleaned          |  0

Total in 74 ms
执行成功后,会生成一个public 目录,这个目录中的内容,就是我们博客系统的所有内容,我们需要将这些内容存放在Git 仓库中。
9.2,部署到Git
按照如下步骤将博客内容上传到Git 仓库,在public 目录下,依次执行下面的命令:
# 初始化仓库
git init

# 将所有内容添加到git
git add .

# 提交到git 本地
git commit -m "我的博客第一次提交"

# 关联到远程git,注意这里需要写你自己的git 地址
git remote add origin https://github.com/codeshellme/codeshellme.github.io.git

# 推送到远程git
git push origin master
9.3,访问公网地址
经过上面的步骤,我们就将博客内容托管在了github。那么你的博客的地址将是这种格式:
https://仓库名字
例如我的博客地址就是:
https://codeshellme.github.io
访问这个地址就可以访问我们的博客了。
如果以后我们写了新的博客,则需要再使用hugo 命令生成新的内容,再将新的内容push 到Git 仓库就可以
10,给博客添加评论功能
博客有了评论功能才能跟读者互动,所以评论功能对一个博客来说也是必不可少的。
可用的评论系统插件 有挺多的,比如:
在这几个之中,我比较喜欢的Valine,因为其它几个在评论的时候都需要读者登录账号,授权等等,我觉得这样比较麻烦,会让读者失去评论的兴趣。
而Valine 不需要读者登录就可以对文章进行评论,而且简洁高效。下面我们主要介绍如何使用Valine 来为我们的博客系统增加评论功能。
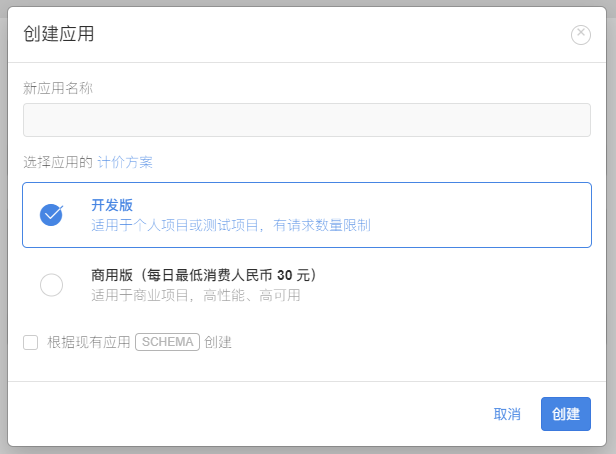
10.1,注册登录leancloud 账号
首先需要注册并登录一个leancloud 账号,登录账号之后,进入下一步。
10.2,创建一个应用并记录App Id 和App Key
登录账号后,进入控制台,点击创建应用来创建一个应用
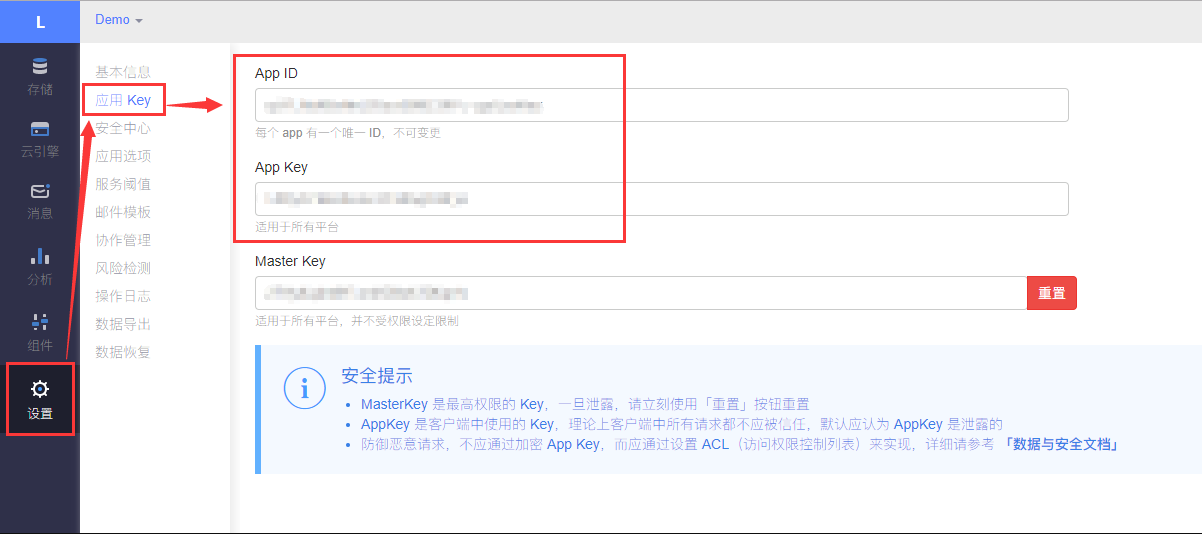
应用创建好以后,进入刚刚创建的应用,点击左下角的设置>应用Key,就能看到你的APP ID和APP Key了:
10.3,创建两个存储
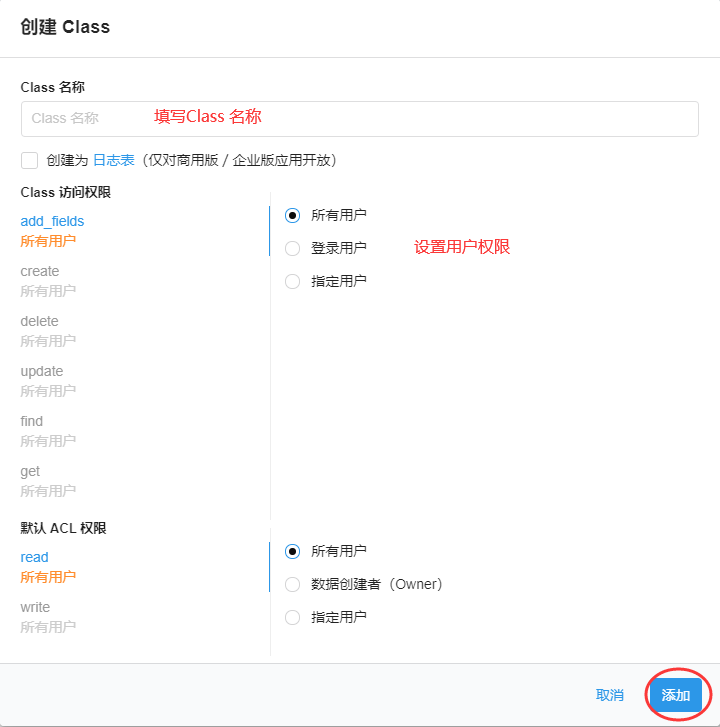
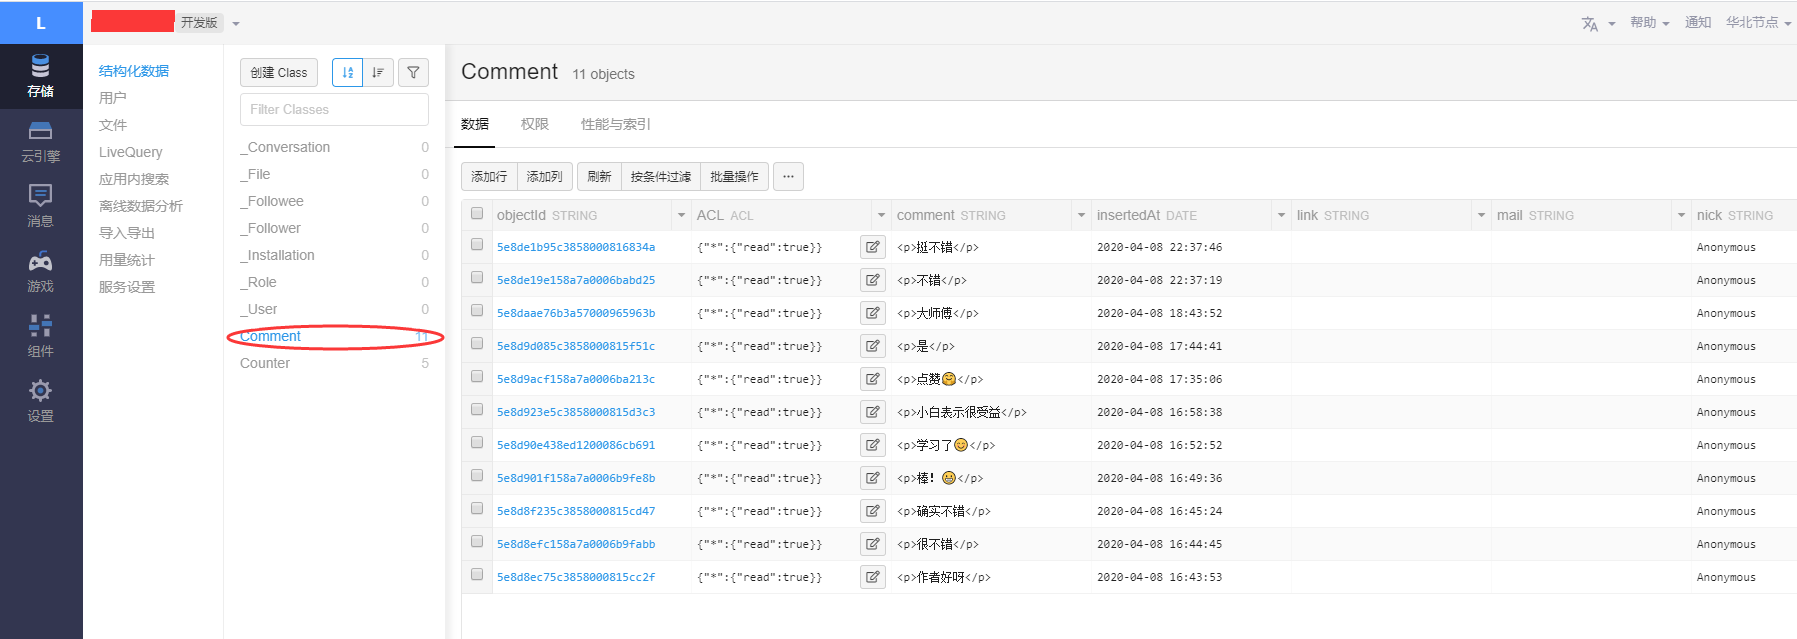
因为评论和文章阅读数统计依赖于存储,所以要建立两个存储 Class,分别命名为Counter (用于计数功能)和 Comment(用于评论功能)。
左边栏找到并点击 存储,点击 创建Class:
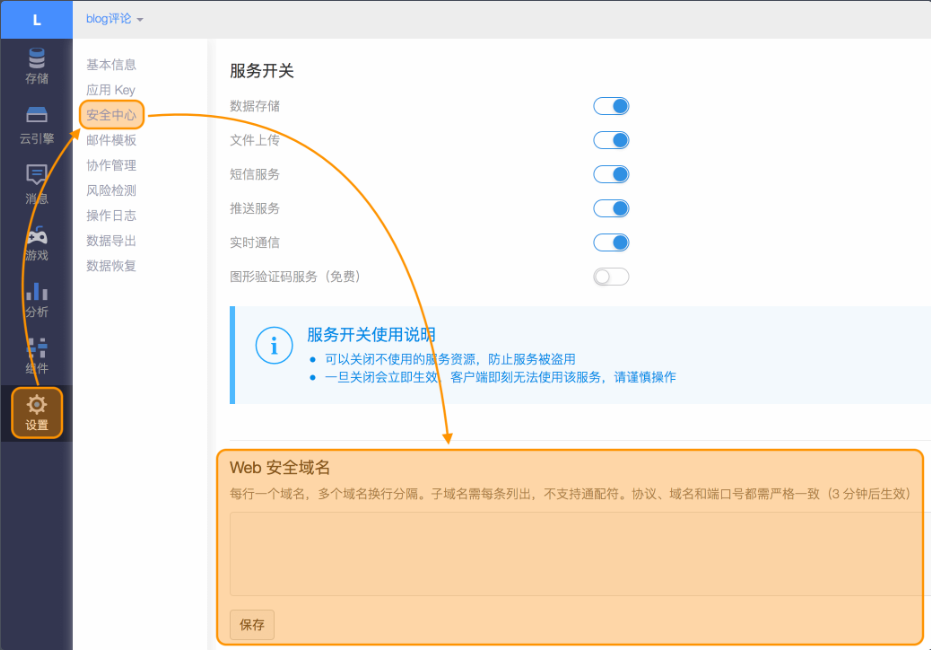
10.4,为应用添加安全域名
左边栏点击设置,找到安全中心,点击后会看到安全域名设置框,输入博客使用的域名,点击保存即可,比如我这里填写的是:
https://codeshellme.github.io/
到这里为止,leancloud 账号的设置工作才算完成。接下来我们来看如何使用Valine 评论系统。
11,使用Valine 评论系统
这里我写一个简单html 页面,来演示如何使用Valine,代码如下:
<!DOCTYPE html>
<html>

<head>
    <title>Valine 评论测试</title>
    <!-- 引入Valine js 脚本 -->
    <script src='https://unpkg.com/valine/dist/Valine.min.js'></script>
</head>

<body>
    <h2>下面就是Valine 评论系统</h2>
    <hr />
    <div id="vcomments"></div>
    <script>
    new Valine({
        el: '#vcomments',
        appId: 'xxx',	// 这里填写 10.2 节我们得到的App Id
        appKey: 'yyy',	// 这里填写 10.2 节我们得到的App Key
        notify: false,
        verify: true,
        avatar: 'robohash',
        placeholder: '在这里评论'
    })
    </script>
</body>

</html>
这里面有一些Valine 参数需要解释一下:
| 参数 |作用 |
|–|–|
| appId | 这是在 10.2 节得到的App Id |
| appKey | 这是在 10.2 节得到的App Key |
| notify | 用于控制是否开启邮件通知功能 |
| verify | 用于控制是否开启评论验证码功能 |
| avatar | 用于配置评论项中用户头像样式 |
| placeholder | 评论框的提示符 |
可以参见这里查看更多配置项。
然后将上面的html 代码放在Apache 中(也可以是其它Web Server),从浏览器中访问这个html 页面,是这样的:
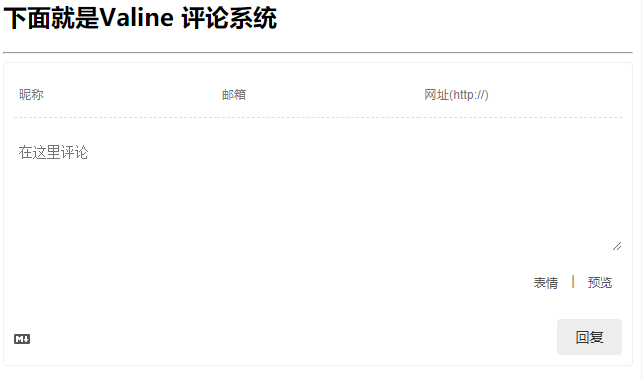
我们就可以在这里评论了。
我们可以进入下面的页面,对这些评论内容进行管理,比如删除评论:
12,在Hugo 博客中使用Valine
有些Hugo 主题就自带了Valine 评论功能,我们只需要在配置文件config.toml 中配置就可以使用。
一般配置代码就是下面的样子:
[params.valine]
    enable = true	# 打开评论功能
    appId = 'xxx'
    appKey = 'yyy'
    notify = false
    verify = true
    avatar = 'robohash'
    placeholder = '评论一下,说明你来过~'
    visitor = true
但是,有些Hugo 主题并没自带Valine 评论功能,这就需要我们自己在Hugo 框架中加入Valine 代码。
比如,我们本篇文章中使用的hugo-theme-bootstrap4-blog 主题,就没有Valine 评论的功能。
我们需要稍微了解一下hugo-theme-bootstrap4-blog 主题的代码结构和语法,才知道在哪里添加怎样的Valine 代码。
下面跟着我的步骤,为hugo-theme-bootstrap4-blog 主题添加Valine 评论功能。
12.1,编写comments.html 文件
编写代码,文件名为comments.html,并将代码放入themes/hugo-theme-bootstrap4-blog/layouts/partials/ 目录中,代码如下(如果看不懂也没有关系,照着做就行):
{{ if and .IsPage (ne .Params.comment false) -}}

  <!-- valine -->
  {{- if .Site.Params.valine.enable -}}
  <!-- id 将作为查询条件 -->
    {{- if .Site.Params.valine.visitor -}}
	  <span id="{{ .RelPermalink | relURL }}" class="leancloud_visitors" data-flag-title="{{ .Title }}">
		<span class="post-meta-item-text">文章阅读量 </span>
		<span class="leancloud-visitors-count">0</span>
		<p></p>
	  </span>
    {{- end }}
  <div id="vcomments"></div>
  <script src="//cdn1.lncld.net/static/js/3.0.4/av-min.js"></script>
  <script src='//unpkg.com/valine/dist/Valine.min.js'></script>
  <script type="text/javascript">
    new Valine({
        el: '#vcomments' ,
        appId: '{{ .Site.Params.valine.appId }}',
        appKey: '{{ .Site.Params.valine.appKey }}',
        notify: {{ .Site.Params.valine.notify }},
        verify: {{ .Site.Params.valine.verify }},
        avatar:'{{ .Site.Params.valine.avatar }}',
        placeholder: '{{ .Site.Params.valine.placeholder }}',
        visitor: {{ .Site.Params.valine.visitor }}
    });
  </script>
  {{- end }}

{{- end }}
12.2,使用comments.html 文件
在themes/hugo-theme-bootstrap4-blog/layouts/_default/single.html 文件中加入下面代码,引入comments.html 文件:
{{ partial "comments.html" . }}
你在single.html 的什么位置加入这行代码,Valine 评论区就在页面的什么位置。
12.3,修改配置文件
在配置文件config.toml中加入下面配置项:
[params.valine]
    enable = true	# 打开评论功能
    appId = 'xxx'	# 填写正确的appId
    appKey = 'yyy'	# 填写正确的appKey
    notify = false
    verify = true
    avatar = 'robohash'
    placeholder = '评论一下,说明你来过~'
    visitor = true	# 开启计数功能
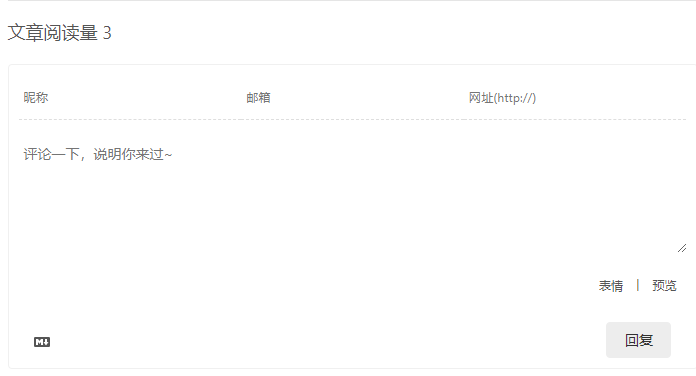
重启博客系统,访问博客中的文章,可见文章中就出现了Valine 评论区:
到此为止,我们就在Hugo 博客中加入了评论功能。
13,如何让Hugo 中的文章支持HTML 元素
考虑到安全性问题,如果你在Markdown 中加入HTML 元素,Hugo 是不支持这种情况的,Hugo 框架会将Markdown 中的HTML 元素转换成如下字符串作为注释:
<!-- raw HTML omitted -->
比如我们写了一篇这样的文章,内容如下:
---
title: "test"
date: 2020-04-09T21:38:52+08:00
lastmod: 2020-04-09T21:41:52+08:00
categories: ["test"]
author: "@码农加油站"
weight: 40
slug: "test-md"
---

这只是一个测试文章
<h1>这里有一句话</h1>
当你将它放在Hugo 中访问时,会发现<h1>这里有一句话</h1> 这句话被替换成了<!-- raw HTML omitted --> 而没有显示出来。
如果你想让你的文章支持HTML 元素,需要在Hugo 的配置文件config.toml 中加入配置:
[markup]
    [markup.goldmark]
        [markup.goldmark.renderer]
            unsafe = true
这样,你的文章中的HTML 内容,将正常显示。
Hugo 官方文档中也给出了这个问题的详细说明,详见这里。
文章作者 @码农充电站
上次更改 2020-04-06